Migrating Domain Hosting from Squarespace to Amazon Route 53 – Creating a Route 53 Hosted Zone

In this post, I’ll continue walk you through transferring your domain from Squarespace to Amazon Route 53 while ensuring no to minimal downtime.
Step 1: Pre-Staging DNS Records in Amazon Route 53
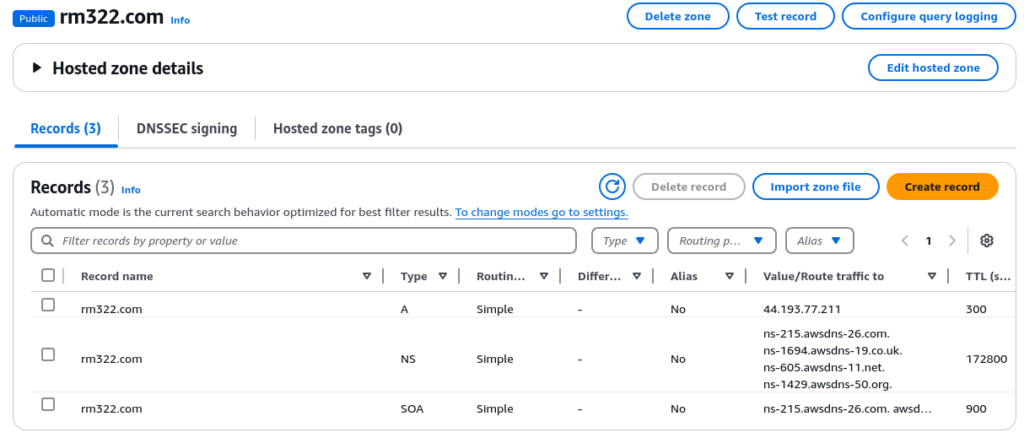
Before you start any actual transfer promise, I recommended you first start by creating a Hosted Zone in AWS for the domain you’d like to migrate. This will allow you to pre-stage records and run some tests before making the actual jump. To start this process, log into AWS and navigate to the Route 53 Dashboard. Select Hosted Zones, and then “Create Hosted Zone” to get started.

Once your hosted zone is created, you’ll need to duplicate whatever records you have over from Squarespace into your zone. In my case, I created a single A record. Amazon will automatically provide NS and SOA records.

Step 2: Testing Your Hosted Zone
You can the new hosted zone using the nslookup tool. Select one or all of the name servers provided by Amazon and verify it returns the correct records. Here’s an example of how I confirmed the the new name servers using one of my home devices:

Step 3: Updating Name Servers in Squarespace
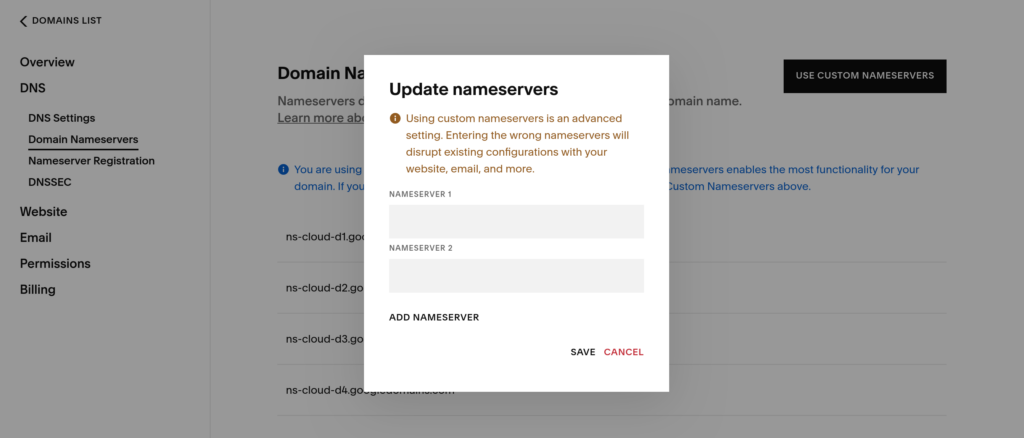
After you’re confident with your hosted zone, log into Squarespace and update the name servers to those provided by Amazon:

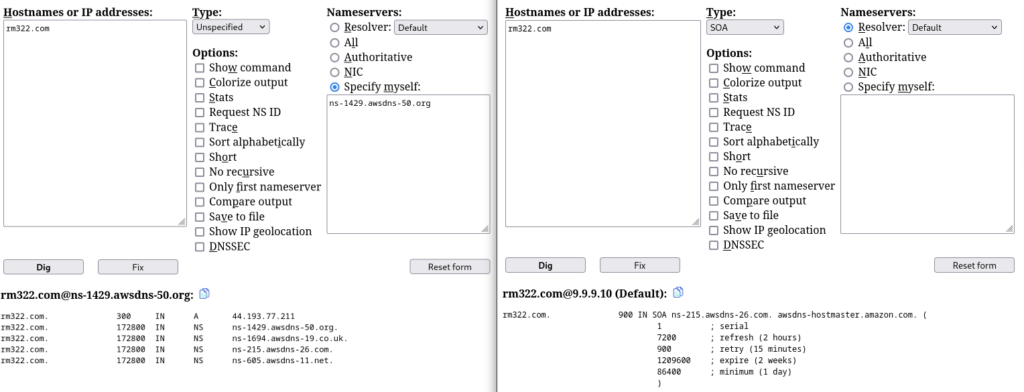
You can test this new configuration using your home network or other DNS tools. Here I am using digwebinterface to validate the A record directly against Amazon’s name server (on the left) as well as checking if the SOA record is now showing Amazon’s SOA against digwebinterface’s default resolver (on the right).

Step 4: Initiating the Transfer
Once you are confident with your tests, you can start the transfer process. You can start this by selecting Registered Domains under Domains, and then selecting the “Transfer in” button. Once you do that, you’ll check to determine if your name is able to be transferred:

Once you validate your domain can be transferred in, Amazon will provide you the following warnings:
- Transfer your DNS service to Amazon Route 53 or another DNS service provider if DNS service will be turned off.
- Confirm that the email for the registrant contact for your domain is up to date.
- Unlock the domain so it can be transferred.
- Turn off DNSSEC for the domain.
- Check to see if you need an authorization code.
- Renew your domain registration before you transfer the domain to make sure it doesn’t become unavailable on the internet.
- Check your Service Quota limits prior to submitting your domain transfer request.
Once you feel confident you have addressed these warnings, click accept to continue the process.
The next step will give a warning about DNS name servers. Even though we’ve already updated them earlier, I want to highlight this particular warning. In my experience moving another domain, any changes made in your previous hosting service after initiating the transfer won’t propagate. That means you should confirm your name server settings are correct now instead of updating them later.

Step 5: Completing the Transfer
After the DNS settings, you’ll next have to validate your domain authorization code provided by Squarespace and validate your points of contact. Once you’ve done that you can review your transfer settings on a final page and choose to submit.

Squarespace will send an email notifying you of the transfer request. You’ll have a cancellation window (five days in my case) to stop the transfer. If you don’t cancel, the transfer will proceed, and Route 53 will become both your domain registrar and DNS provider.
After the set amount of time, you should receive emails from both Squarespace and Route 53 confirming the transfer has completed:

Whats Next/ Final Thoughts
Now that my domain has been migrated, my next DNS project will be related to automating record actions. The first plan that comes to mind is to automate TXT records for Certbot’s DNS validation process. I’ll look to make a future post addressing that. Thanks for reading.